Wednesday, October 30, 2013

Janine Antoni

To prepare for our soap carving project, we were to watch a segment on artist Janine Antoni, creator of Lick & Lather (1993). I gleaned much from her Art 21 video, as I do from every episode of the series. My art teacher in high school often had us watch Art 21 segments; I actually still have my 10th and 11th grade notes about James Turrell, Mark Bradford, Laylah Ali, Maya Lin, Laurie Anderson, and Pepón Osorio, among others. It's an undeniably wonderful resource for expanding one's knowledge of contemporary artists and practices as well as finding inspiration.


Chocolate, left, and soap, right
"Cleaning the body with the body / Feeding oneself with the body"

Here's what I scribbled while watching Janine Antoni's video: 

  • Stories held in the material
  • The taking apart of things - what things are made of. Taking apart to understand
  • Body as a tool, the maker of experience
  • CLUES
  • Cow drinking from bath - reversal of relationship: breasts and the archetype of the Virgin Mary
  • The importance of "holding"
  • Our distance from the true source of things
  • Submission / absence
  • What is "me-ness"?
  • Chunk from ear that falls off while she washes herself with herself, both sad and beautiful
  • Loving = erasing?
  • The tightrope, the horizon: balance comes from being comfortable with being out of balance
  • Learning leads to learning leads to learning
One thing I love about the Art 21 series is that every episode is, in itself, a work of art. For example, in Antoni's segment, the editors used her found objects rope piece, Moor (2001), to link the episode together. By using images of the rope for transitions, they made the pragmatic and symbolic aspect of the object-to tie or bring things together-an essential part of the video. Moor reminds me why I am a bit of a packrat...I love collecting things and putting them together to create meaning. There's nothing quite like holding an item, especially a personal one, and feeling the electricity of all it's ever meant and will ever mean surge through your body.


Just a small segment of the rope, but it contains so many lives


 "If I don’t have an experience with the object, how can I hope that the viewer will have an experience with the object?" - Antoni

Tuesday, October 22, 2013

Animal Testing: Soap Carving and Form Changing

Soap Carving: An Overview

Besides my patience, the soap carvings project really tested my ability to apply previous problem solving solutions to a new medium. I had never really sculpted seriously before this assignment; though familiar with Play-doh and those coil pots everyone makes in art class on "clay day," subtracting from a form with carving tools proved much more complicated than sculpting (with the ability to add to and easily "fix") a piece. I felt a lot like SpongeBob in the episode "Artists Unknown" when he talks about the process of really knowing one's marble before beginning to work with it.


YOU GOTTA BE THE MARBLE!

Unlike SpongeBob, I'm not sure if I ever really "became" my soap. But one thing is for certain: I will never, ever be able to forget the smell of Fiorentino peony and seaside body bars. 

Professional pictures of my final pieces are forthcoming. Below, however, is the process one of my sculptures underwent to transform into a new object. Miss Laura said, "If it feels wrong, that probably means you should do it." Well, I did it...and let's just say that things got pretty nasty.

Creating a New Form: Addition and Subtraction


I started out with this lumpy critter as my animal form.


I then grated the tiger's head and tail. (Subtraction) 


This resulted in a pile of soap shavings, which I then scooped into a Ziploc bag, mixed with purple ink, and put in the freezer (depicted below). 


Because I had grated off the tiger's tail, the stick that held it to the tiger's body was no longer necessary. So I used the extraneous stick to poke holes all over the tiger's body. (Subtraction)


Going along my concept, which I will explain later in greater detail, I tried to use mostly cosmetic/bathroom products. Consequently, I covered the tiger with Crest toothpaste. (Addition)


I then stuck the tiger in the oven at 400 degrees for 20 minutes. I felt really bad about it, but it had to be done. (Subtraction/Addition)


While the tiger baked, I created a simple form of tiny Dixie cups (used for water, mouthwash, etc.).  


This is when things started to get stinky. A strange, clinical odor emanated from the oven, especially in the last few minutes of the baking process. It smelled like a dentist's office, but one where something was definitely amiss. The toothpaste had bubbled and formed a crusty layer over the soap.


I then cut the tiger into three pieces (Subtraction)


As if things didn't already stink enough, I decided to add lip gloss to the mix. Using the cosmetic like glue, I put the pieces back together. (Addition)


Then came my worst/best idea: to microwave the tiger on high for 1 minute. I stopped at about :40 because the microwave started smoking and it smelled really, really horrible. However, after letting it rest for a bit, I was able to finish the minute. (Subtraction/Addition) 


The odor of the hot, mutated soap/toothpaste/lip gloss nearly made me puke at least four times after taking it out of the microwave.


While trying not to vom, I scooped the fluffy mush into the Dixie cups (pictured below). (Addition) I also discarded the material that did not fit into the cup structure. (Subtraction)


I then stuck Q-Tips into the mixture. (At this point, everything smelled so bad that I slowly felt my body shutting down.) (Addition)   


After placing the form in an aluminum baking pan, I took the inked shavings out of the freezer and sprinkled it over top the whole thing. (Addition)


FINALLY...


"Animal Testing" 


Sunday, October 6, 2013

Elements and Principles in 3D Form

The first project of my 3D Design career challenged me both conceptually and materially. We were to use only balsa wood, masking tape, wood glue, straight pins, and clear tape to create four sculptures, each representative of a specific element or principle of design. Although every material need not be present in each sculpture, all had to be utilized at least once in the span of our collection.

Sculpture 1: Pattern 
"I Had This Argument Before"


       In my first sculpture, I portrayed the principle of pattern using balsa wood, masking tape, and straight pins. The w.i.p. photo to the left shows the painstaking process to which I subjected myself in order to create a controlled visual experience: loops of tape with the sticky side facing outwards. I create two layers of loops, careful not to crush the delicate "underloop" layer as I added the second on top, and then raised the square platform with loop-encased pins to structurally continue the motif. I added pins in a careful pattern to the top loops, giving further unity and texture to the sculpture. The myriad loops contrast strikingly with the flat "oneness" of the square plane on which they rest. While the visual experience is thus expected, it is rewardingly so; I have to admit, it's a lot of fun to look through the negative space the loops create as light dapples through. One thing I wish I had fixed, however, is the spacing on the left side of the sculpture. With slightly too much wood and not enough tape, it looks a little unbalanced, which in turn throws off the regularity of the pattern I tried to build. Proper measuring (and, in turn, patience) is something I still need to work on - too much of the time I just cut without consulting my ruler first.   


Sculpture 2: Scale
"Planets"


       For my second sculpture, I played with notions of scale by creating clear tape balls of different sizes and placing them in a somewhat surreal, cosmic setting. I am not a sci-fi fan by any means, and my sister and I always made fun (lovingly, of course) of Denny's space-themed kid's menu (Galactic grapes! Space Cadet mac 'n' cheese!), however I really like the spindly, rover-esque legs supporting the main platform of the sculpture. I trapped wood shavings and other bits and pieces littering my cutting board in the tape balls. I then decided to add a strange, tape-based offshoot perpendicular to the taller balsa wood platform. I used wood glue to create a goopy, yellowish mess dripping from the upper platform to the tape mat, and continued making tape balls of different sizes to place on this lower platform. I also trapped glue between the pieces of tape, playing with actual and intangible texture. Overall, the design does not overwhelm my emphasis of scale, however its main flaw is in its flimsiness - I should have reinforced the bottom platform with a piece of wood underneath. Nevertheless, I am happy with my final result. It's out of this world! 


Sculpture 3: Texture
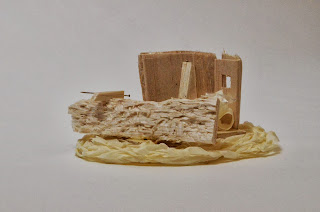
"Our Home" 


     Texture is one of my favorite elements of design. In my third sculpture, I wanted to build a small, secure space in which all different textures were able to manifest. I first created a structure of wood, which I then wrapped with masking tape. I twisted the tape to become an unorthodox type of yarn and wove it around and around the wood base, thereby creating a sort of rug-like wreath. (It actually reminds me of the old yet hearty rug underneath the table in my grandma and grandma's kitchen.) The contrast between the wood grain and the "woven" tape is lovely, but I decided to push it further by adding an adjacent piece of wood - this one torn up and gouged by my knife. I added a clear piece of tape to the back of the main square "wall," a pile of tape "garbage" in the corner, and two little needle-like wood pieces on top of the pit-marked wood chunk. Piercing the wood with the pin was strangely satisfying and somewhat therapeutic. Then it started reminding me too much of skin, and I started feeling a little sickly. Although the piece is complicated by its different textures, I believe it retains an important sense of unity. Eyes move around the piece harmoniously and in all directions. 


Sculpture 4: Focal Point
"Alabanza" 

For my final sculpture, I decided to work with focal point. I knew I wanted to make a vertical statement, so I created a diamond-shaped structure wrapped with clear tape and adorned with pins atop a plain wooden base. By creating a stark contrast between the horizontal and vertical planes of the sculpture, I automatically created a focal point, however I wanted to emphasize it even more. To do so, I added a small hanging piece in the diamond structure, to which I gave some fine detail. I still felt like something was missing, however, which is when I decided to add the straight pins (as seen in the w.i.p. photo below). I bent them with my scissors into a state of praise, and so even their line of sight meets up with the small centerpiece of the diamond. I feel like this piece accomplishes what I set out to do, however I believe the main structure could have been strengthened by better, more concise measurements. Like I said, patience, patience, patience!